Live Migration
Live migration means moving a virtual machine to a different host without downtime.
- Live migration is not allowed when the virtual machine is using a management network of bridge interface type.
- Live migration is not allowed when the virtual machine has any volume of the
CD-ROMtype. Such volumes should be ejected before live migration. - Live migration is not allowed when the virtual machine has any volume of the
Container Disktype. Such volumes should be removed before live migration. - Live migration is not allowed when the virtual machine has any
PCIDevicepassthrough enabled. Such devices need to be removed before live migration. - Live migration is not allowed when the volumeAccessMode of any volume in the virtual machine is
ReadWriteOnce. Such volumes should be removed before live migration.
How Migration Works
Each node has multiple CPU models that are labeled with different keys.
- Primary CPU model:
host-model-cpu.node.kubevirt.io/{cpu-model} - Supported CPU models:
cpu-model.node.kubevirt.io/{cpu-model} - Supported CPU models for migration:
cpu-model-migration.node.kubevirt.io/{cpu-model}
During live migration, the system checks the value of spec.domain.cpu.model in the VirtualMachineInstance (VMI) CR, which is derived from spec.template.spec.domain.cpu.model in the VirtualMachine (VM) CR. If the value of spec.template.spec.domain.cpu.model is not set, the system uses the default value host-model.
When host-model is used, the process fetches the value of the primary CPU model and fills spec.NodeSelectors of the newly created pod with the label cpu-model-migration.node.kubevirt.io/{cpu-model}.
Alternatively, you can customize the CPU model in spec.domain.cpu.model. For example, if the CPU model is XYZ, the process fills spec.NodeSelectors of the newly created pod with the label cpu-model.node.kubevirt.io/XYZ.
However, host-model only allows migration of the VM to a node with same CPU model. For more information, see Limitations.
Starting a Migration
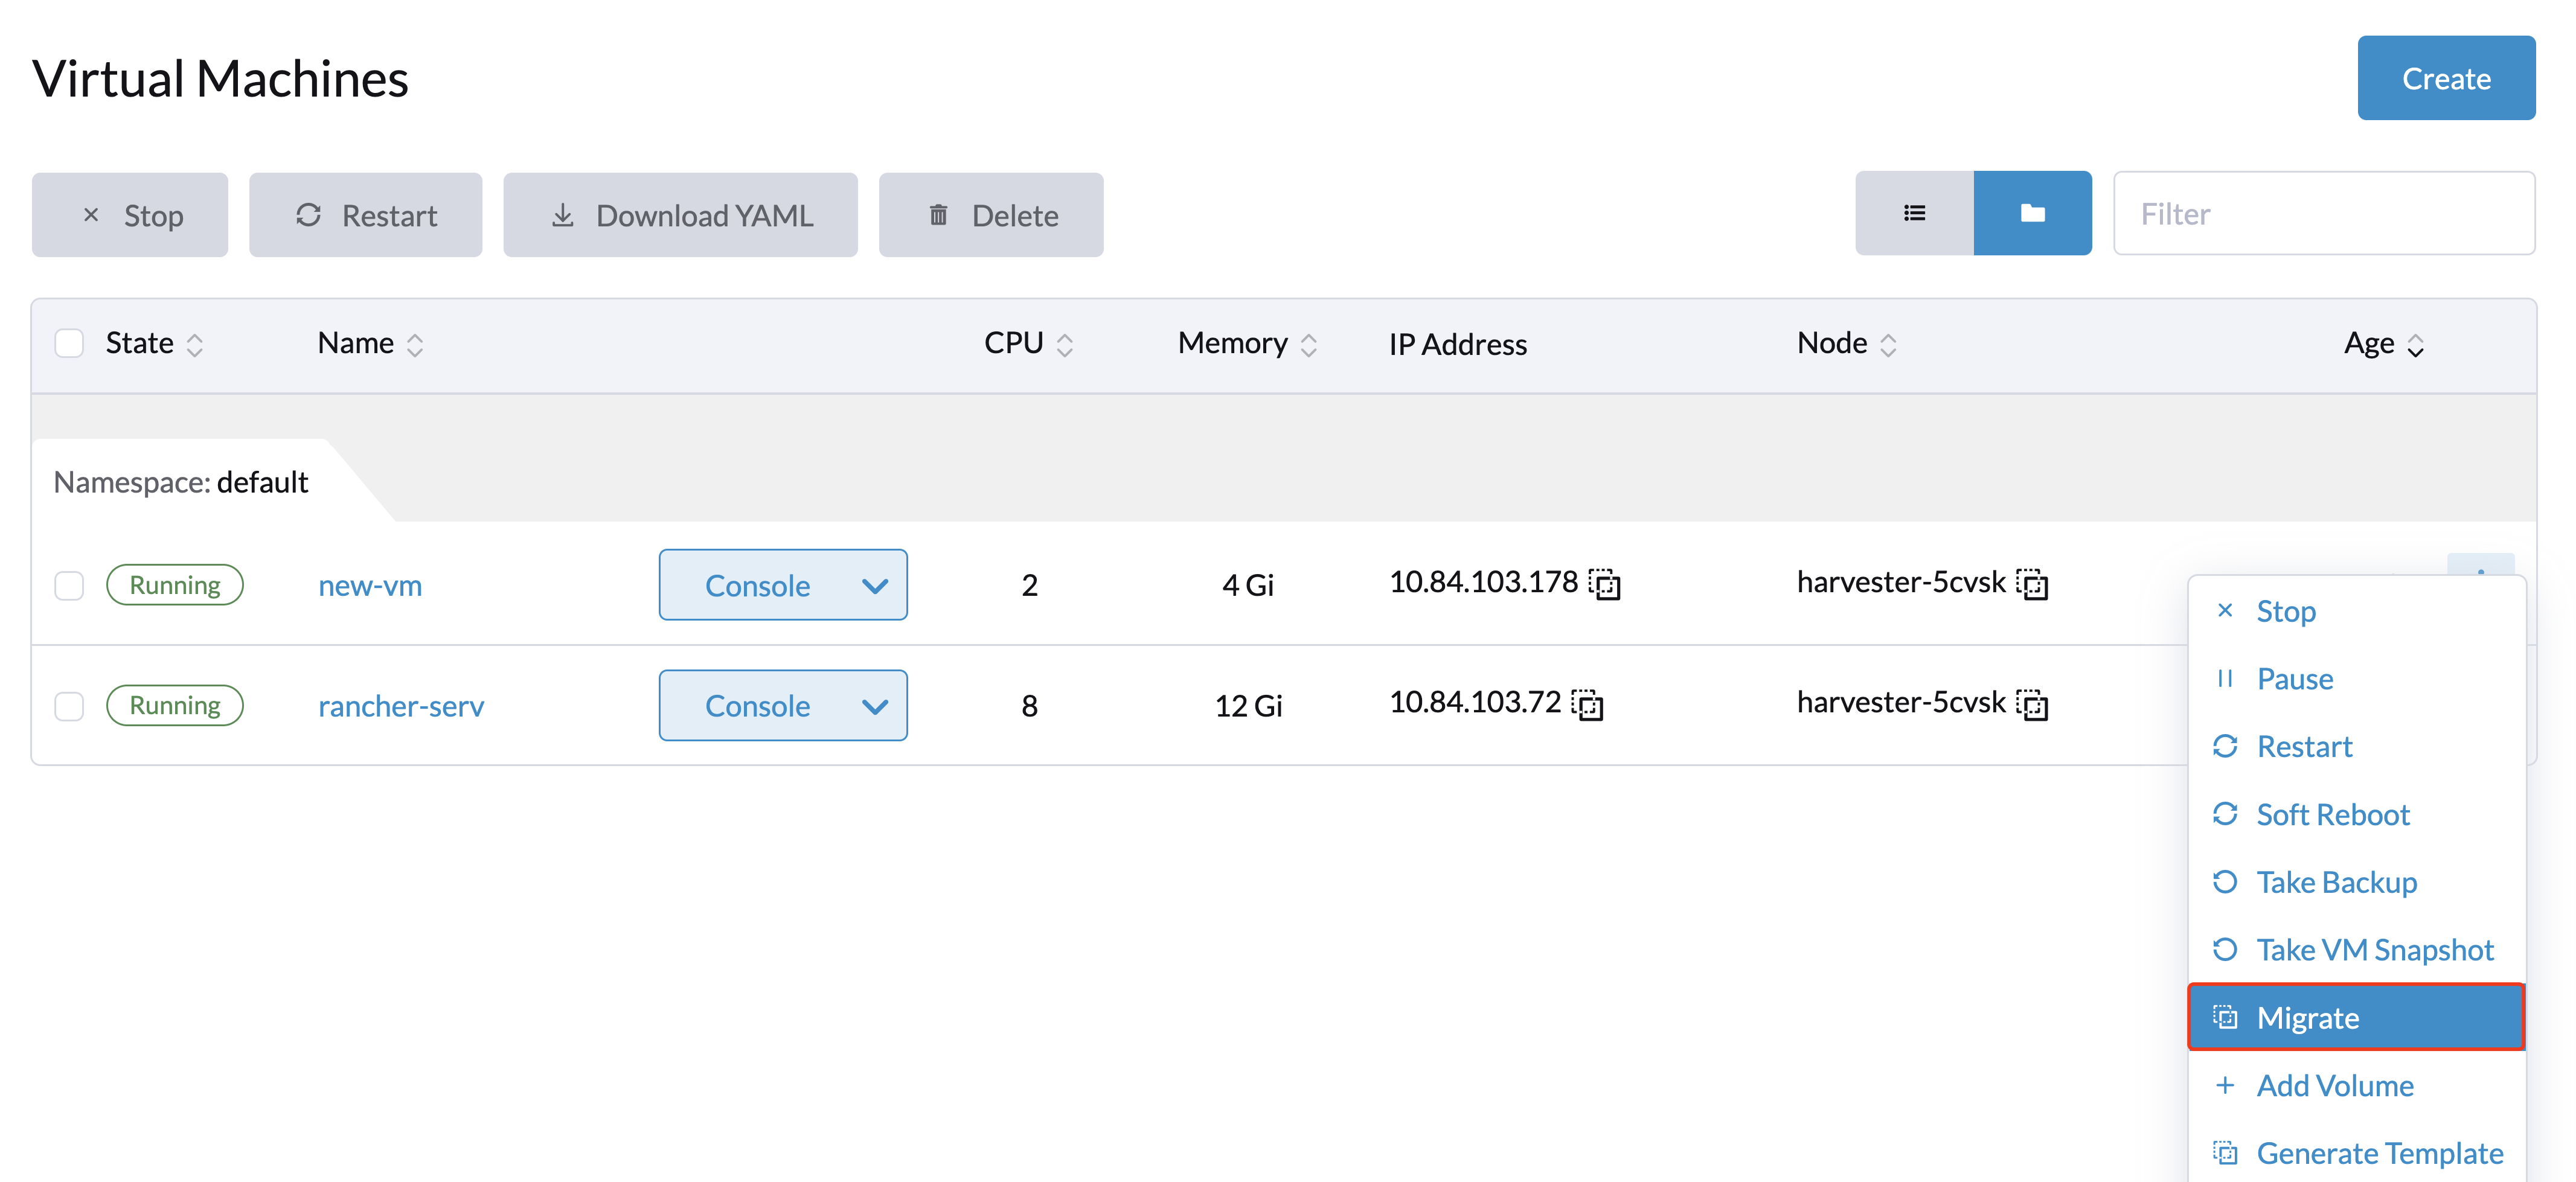
- Go to the Virtual Machines page.
- Find the virtual machine that you want to migrate and select ⋮ > Migrate.
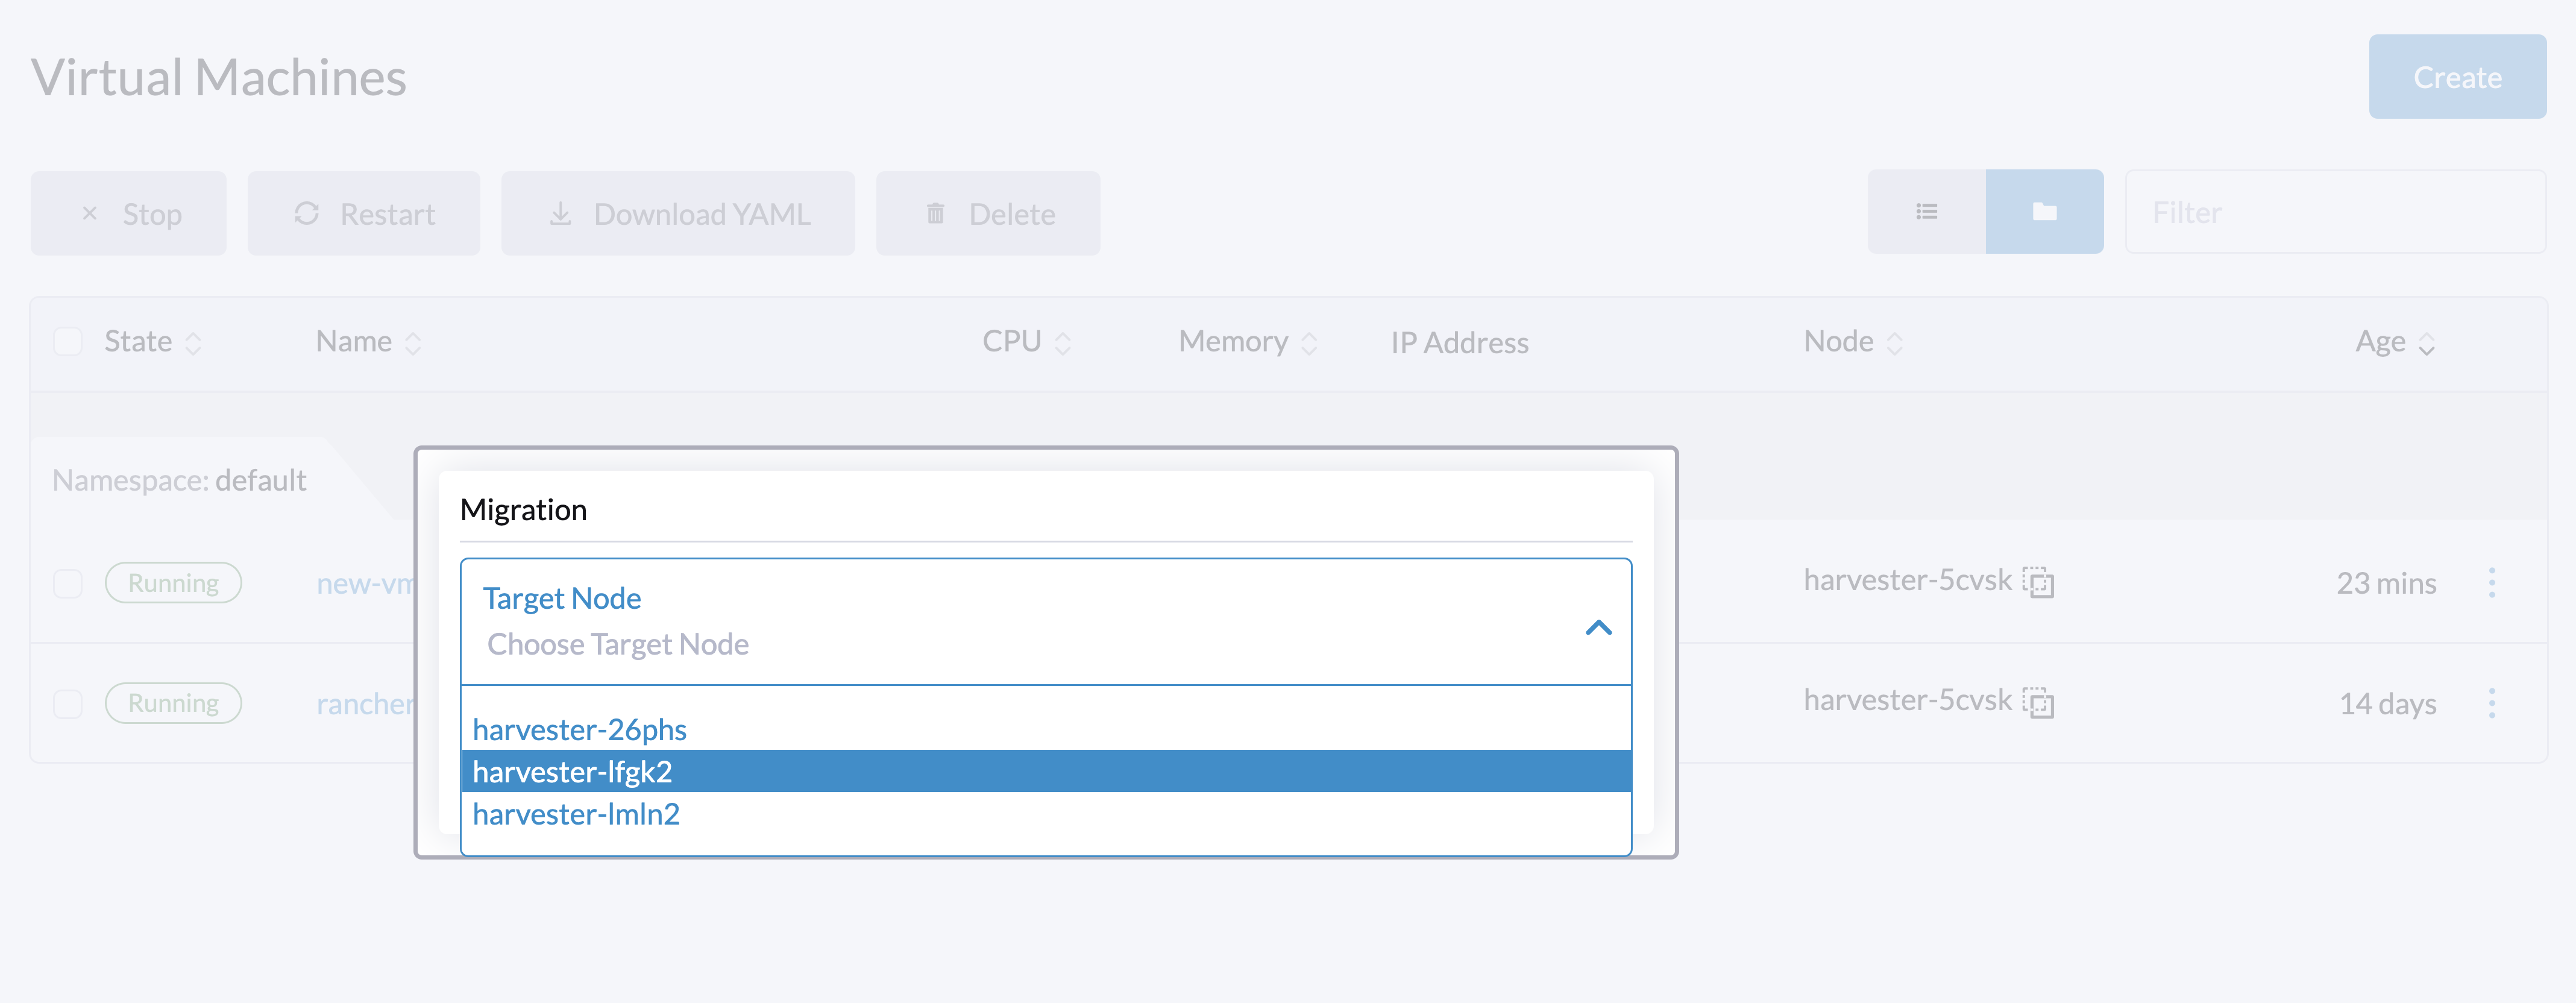
- Choose the node to which you want to migrate the virtual machine. Click Apply.
When you have node scheduling rules configured for a VM, you must ensure that the target nodes you are migrating to meet the VM's runtime requirements. The list of nodes you get to search and select from will be generated based on:
- VM scheduling rules.
- Possibly node rules from the network configuration.
Aborting a Migration
- Go to the Virtual Machines page.
- Find the virtual machine in migrating status that you want to abort. Select ⋮ > Abort Migration.
Migration Timeouts
Completion Timeout
The live migration process will copy virtual machine memory pages and disk blocks to the destination. In some cases, the virtual machine can write to different memory pages or disk blocks at a higher rate than these can be copied. As a result, the migration process is prevented from being completed in a reasonable amount of time.
Live migration will be aborted if it exceeds the completion timeout of 800s per GiB of data. For example, a virtual machine with 8 GiB of memory will time out after 6400 seconds.
Progress Timeout
Live migration will also be aborted when copying memory doesn't make any progress in 150s.
Monitoring
For information about viewing real-time metrics, see Live Migration Status and Metrics
Limitations
CPU Models
host-model only allows migration of the VM to a node with same CPU model. However, specifying a CPU model is not always required. When no CPU model is specified, you must shut down the VM, assign a CPU model that is supported by all nodes, and then restart the VM.
Example:
- A node:
host-model-cpu.node.kubevirt.io/XYZcpu-model-migration.node.kubevirt.io/XYZcpu-model.node.kubevirt.io/123 - B node:
host-model-cpu.node.kubevirt.io/ABCcpu-model-migration.node.kubevirt.io/ABCcpu-model.node.kubevirt.io/123
Migrating a VM with host-model is not possible because the values of host-model-cpu.node.kubevirt.io are not identical. However, both nodes support the 123 CPU model, so you can migrate any VM with the 123 CPU model using either of the following methods:
- Cluster level: Run
kubectl edit kubevirts.kubevirt.io -n harvester-systemand addspec.configuration.cpuModel: "123". This change also affects newly created VMs. - Individual VMs: Modify the VM configuration to include
spec.template.spec.domain.cpu.model: "123".
Both methods require the restarting the VMs. If you are certain that all nodes in the cluster support a specific CPU model, you can define this at the cluster level before creating any VMs. In doing so, you eliminate the need to restart the VMs (to assign the CPU model) during live migration.
Network Outages
Live migration is highly sensitive to network outages. Any interruption to the network connection between the source and target nodes during migration can have a variety of outcomes.
mgmt Network Outages
Live migration via mgmt (the built-in cluster network) relies on the availability of the management interfaces on the source and target nodes. mgmt network outages are considered critical because they not only disrupt the migration process but also affect overall node management.
VM Migration Network Outages
A VM migration network isolates migration traffic from other network activities. While this setup improves migration performance and reliability, especially in environments with high network traffic, it also makes the migration process dependent on the availability of that specific network.
An outage on the VM migration network can affect the migration process in the following ways:
- Brief interruption: The migration process abruptly stops. Once connectivity is restored, the process resumes and can be completed successfully, albeit with a delay.
- Extended outage: The migration operation times out and fails. The source virtual machine continues to run normally on the source node.
The migration process runs in peer-to-peer mode, which means that the libvirt daemon (libvirtd) on the source node controls the migration by calling the destination daemon directly. In addition, a built-in keepalive mechanism ensures that the client connection remains active during the migration process. If the connection remains inactive for a specific period, it is closed, and the migration process is aborted.
By default, the keepalive interval is set to 5 seconds, and the retry count is set to 5. Given these default values, the migration process is aborted if the connection is inactive for 30 seconds. However, the migration may fail earlier or later, depending on the actual cluster conditions.